
The custom-closet look for half the price — and you can take it with you when you move.
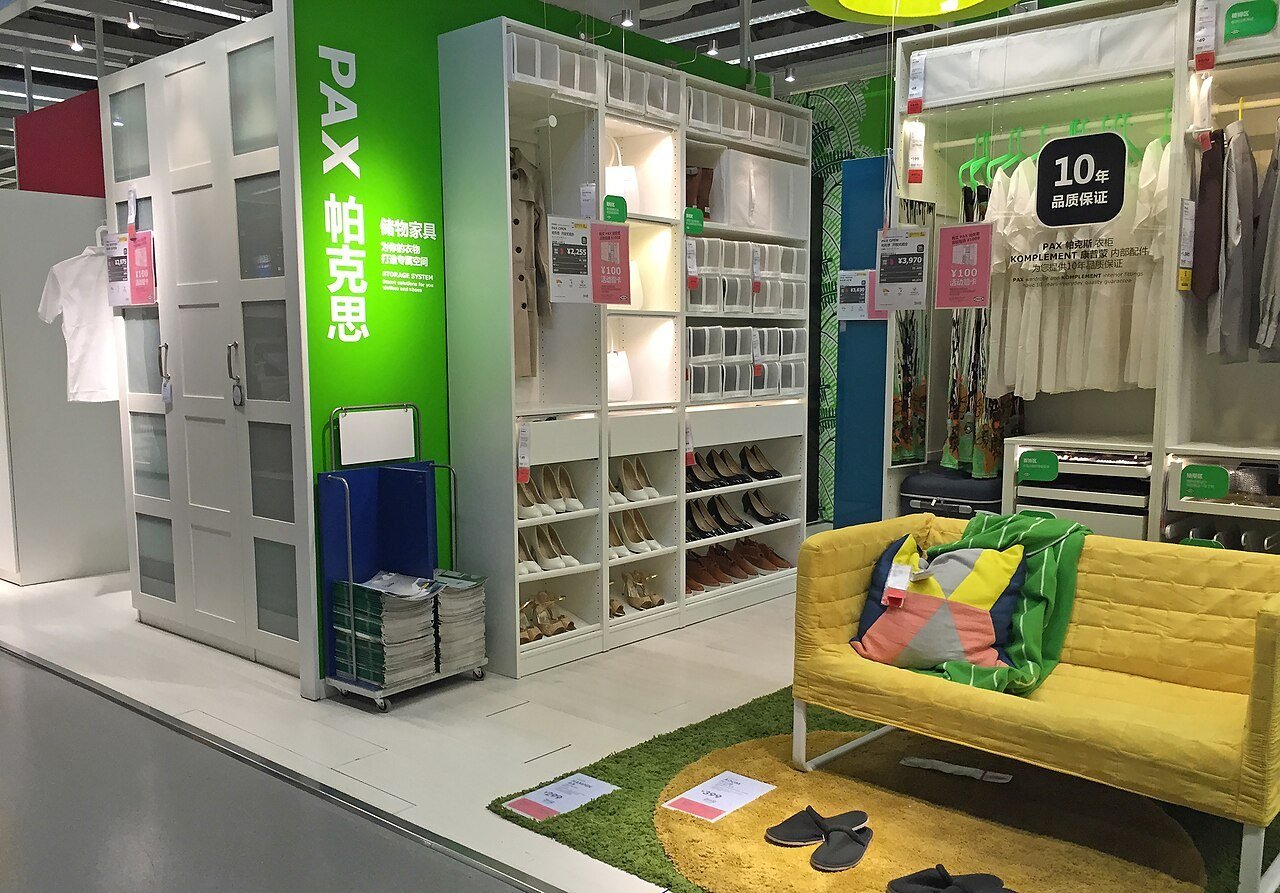
I’ve redone three closets in three different apartments, and every single time I wished I’d known about modular closet systems before I bought a single organizer. These are the mix-and-match kits — shelves, rods, drawers, and shoe racks built to standard sizes — that snap together into a closet that looks fully custom but costs a fraction of the price.
The best part? Nothing is permanent. When my wardrobe changed from suits to mostly casual, I moved two shelves and converted a long-hang section into double-hang in about twenty minutes. Try that with a nailed-in built-in.
This guide walks you through the 14 modules that matter, the three system types, exact measuring rules in inches, real costs, and the mistakes I made so you don’t have to.
Whether you’re outfitting a tiny reach-in in a rental or designing a full walk-in in a home you own, the process is the same: audit your wardrobe, measure in inches, pick your system type, and install in an afternoon. No carpentry skills required — if you can hang a picture straight, you can build a modular closet.
What Is a Modular Closet System?
A modular closet system is a closet built from standardized, interchangeable parts — shelves, hanging rods, drawers, and cabinets — that you combine to fit your exact space, then rearrange later as your needs change.
Think of it like building blocks for grown-ups. Instead of one fixed piece of furniture, you buy a kit of parts engineered to the same dimensions. Start with hanging rods and a few shelves today; add a drawer tower and shoe shelves next year. Everything snaps, slides, or hooks into the same frame.
That flexibility is the whole point. A traditional built-in gets cut to fit one closet and stays there forever. A modular system adapts — to a new wardrobe, a growing family, even a new home, because many systems can be uninstalled and reconfigured in your next place.
Why You’ll Love Modular Closet Systems
- Custom look, kit price. Standardized parts are cheaper to manufacture than one-off carpentry, so you get the high-end aesthetic for 40-60% less than a true built-in.
- Nothing is permanent. Move a shelf, swap a rod, add a drawer tower — most changes take minutes and no power tools.
- Start small, grow later. Buy the essentials now and add modules over time. Your budget (and your closet) can expand in stages.
- Renter-friendly options. Wall-mounted rail systems leave just a few screw holes to patch, and freestanding tower kits leave zero.
- Built for your actual clothes. The layout follows your wardrobe — double-hang for shirts, long-hang for dresses — instead of the one rod the builder installed.
- It moves with you. Unbolt it, pack it, reinstall it. I’ve taken mine across town and it fit the new closet with a different layout.
Hanging Modules: The Backbone of Your Closet
Clothes you hang take up the most visual space and the most decision-making. Get the hanging right and the rest of the closet falls into place.
1. Double-Hang Sections
Two rods stacked vertically — one high, one low — in the same 5-foot-wide bay. This is the single highest-impact module in any reach-in closet, because it doubles your hanging capacity in the same footprint.
Short-hang clothes (shirts, blouses, folded pants, jackets) only need about 40 inches of vertical space each. Stack two levels and one 60-inch-wide section holds roughly 40-50 garments instead of 20. I converted my entire first closet to double-hang and it felt like I’d gained a second closet overnight.
The measurements: mount the lower rod about 40 inches from the floor and the upper rod about 80 inches from the floor. Leave at least 3 inches of clearance between the top of the lower clothes and the upper rod.
Try it: count your short-hang items (shirts, blouses, jackets). Every 20 of them fills one 24-inch-wide double-hang section.
2. Long-Hang Zones
One tall section with a single rod, reserved for dresses, maxi skirts, jumpsuits, and coats. Long garments need 66-72 inches of clear vertical space from rod to floor — anything less and your hems pool on the floor or fold over a shelf.
Don’t guess how much long-hang you need. I made that mistake and dedicated half my closet to dresses I own exactly four of. Pull out every long item you actually wear, measure the longest one, and size the zone to reality — most people need one 24-36 inch wide section, not three.
The measurements: hang the rod 68-70 inches from the floor for full-length dresses. If you wear mostly knee-length dresses, 60 inches works.
Try it: hang your longest dress on a hanger, measure from hook to hem, add 4 inches — that’s your rod height.
3. Wall-Mounted Top Tracks & Standards
This is the skeleton everything hangs from: a horizontal rail screwed into wall studs near the ceiling, with vertical standards (the slotted metal or wood strips) hanging down from it. Shelves, rods, and baskets hook into the standards at any height.
The wall-mounted design is why these systems are so adjustable — no tools needed to move a shelf up or down on most rail systems. It’s also the renter-friendly star: when you move out, you patch a few screw holes in the track line instead of a wall full of anchor holes.
The measurements: mount the track 80-84 inches high, leveled, and hit at least every other stud (16 inches on center in most US homes). Use a stud finder, not drywall anchors, for the track itself.
Try it: before buying, find your studs with a cheap magnetic stud finder — if your closet wall is concrete or plaster over brick, budget for a masonry bit and different anchors.
Shelving Modules: Where Foldables Live
Folded clothes, bags, and bins need shelves — but not the single sad shelf the builder left you. Here’s how the pros layer them.
4. Adjustable Open Shelves
The workhorse module. Open shelves at multiple heights hold folded sweaters, jeans, tees, and handbags — everything you grab daily. Adjustability matters more than you think: sweater stacks need 12-14 inches of clearance, tee stacks need 8-10, and your needs change with the seasons.
Ventilated wire shelves (the ClosetMaid style) are the cheapest and let air circulate, which helps in damp closets. Solid laminate shelves look cleaner and won’t leave ridges on folded knits. I switched my sweater shelves from wire to solid after finding wire marks pressed into a cashmere blend — lesson learned.
The measurements: 14-inch-deep shelves for folded clothes, 16-inch-deep for bins and bags. Space shelves 10-12 inches apart for folded stacks.
Try it: fold your tallest sweater stack and measure it — then set your first shelf exactly 2 inches above that height. No wasted air.
5. Corner Shelves for Dead Corners
Corners in L-shaped and U-shaped closets are where storage goes to die. A corner shelf module — shelves that wrap the corner at a 45-degree angle or L-bracket shelves meeting at the corner — reclaims that space for bags, hats, and bins.
The trick is access. Deep corner shelves become black holes where things go in and never come out. Keep corner shelves shallow (12 inches) and store only things you can see from the front: handbags lined up, hat boxes, labeled bins.
The measurements: allow 24 inches of clear corner space per side for the wrap; anything tighter and hangers collide.
Try it: stand in your closet corner and swing a hanger in an arc — if it hits the side wall, that corner is shelf-only territory.
6. High Top Shelves for Seasonal Storage
The shelf above 72 inches is prime real estate most closets waste. This is your seasonal zone: winter coats in summer, beach bags in winter, luggage, and the “someday” box.
Keep it to one deep shelf (16 inches) rather than two shallow ones — you’ll store bulky items up there, not things you need to see. Label everything. I use clear bins with big labels because “mystery bin on the top shelf” is how you end up buying a second set of ski gloves.
The measurements: mount the top shelf 12 inches below the ceiling (most closets have 8-foot ceilings, so around 84 inches from the floor). Leave the space below it open for tall items.
Try it: put a step stool in the closet permanently — if the top shelf needs a ladder expedition, you’ll never use it.
Drawer & Cabinet Modules: The Hidden Storage
Open storage is great until it’s not. Drawers and cabinets hide the visual noise — underwear, socks, accessories, the stuff that makes a closet look chaotic even when it’s organized.
7. Drawer Towers
A vertical stack of 3-6 drawers, usually 18-24 inches wide, that slots between hanging sections. This is where folded delicates, underwear, socks, workout gear, and accessories live. One drawer tower replaces an entire dresser for most people.
Drawer depth matters more than drawer count. Shallow 6-inch drawers are perfect for socks and underwear (deep drawers just become pits). Medium 8-inch drawers handle tees and workout clothes. Reserve the one deep 10-inch drawer for bulky items like hoodies.
The measurements: a standard tower is 24 inches wide, 16 inches deep, and 30-48 inches tall depending on drawer count. Leave 24 inches of clear floor space in front so drawers open fully.
Try it: sort one dresser drawer into “flat and small” vs “bulky” — the flat-and-small pile belongs in shallow tower drawers.
8. Soft-Close Drawers for Delicates
Upgraded drawers with soft-close glides and often felt-lined or velvet-lined interiors. These are the jewelry drawer, the watch drawer, the sunglasses drawer — the small valuables that get destroyed rattling around in a regular drawer.
Are they worth the upcharge? For one or two drawers, yes. The soft-close mechanism stops the slam-shut that chips watch faces and tangles necklaces, and the lining keeps everything from sliding. I put my everyday jewelry in one lined drawer and stopped losing earrings entirely.
The measurements: a single 6-inch-deep lined drawer (about 20 inches wide) holds a surprising amount — roughly 30 pairs of earrings, 10 necklaces on hooks, and a watch roll.
Try it: if the upgrade feels steep, line one standard drawer with a $10 velvet drawer liner and add a $12 acrylic tray — 80% of the benefit.
9. Cabinets With Doors
Closed cabinets at the top or bottom of your system hide everything you don’t want to look at: cleaning supplies, gift wrap, the iron, off-season accessories. They also give a modular closet its “custom built-in” look — doors make a kit read as furniture.
Mix open and closed storage deliberately. The design rule I follow: daily-use items stay open (you’ll actually put them away), ugly-or-rare items go behind doors. A closet that’s 100% open shelving looks like a store display; 100% closed doors means you’ll never find anything.
The measurements: cabinet modules typically run 24-36 inches wide and 12-16 inches deep. Shallow 12-inch uppers keep doors from swinging into your face in a narrow reach-in.
Try it: stand in your closet and mime opening a door — if your elbow hits the opposite wall, that spot needs drawers, not doors.
Shoe & Accessory Modules: The Details That Matter
These small modules are what separate a “closet with stuff in it” from a closet that feels designed.
10. Angled Shoe Shelves
Shoe shelves tilted at a slight angle so you can see every pair at a glance. Flat shelves hide the back row; angled shelves turn shoes into a display. This one change made me stop buying duplicate black flats because I could finally see the ones I owned.
Count your shoes honestly first. The average American owns around 19 pairs — measure for the collection you have, not the collection you aspire to. Angled shelves hold about 4-6 pairs per 24-inch-wide shelf depending on shoe size.
The measurements: tilt shelves 15-20 degrees, space them 7-8 inches apart for flats and 10-12 for heels and boots. Boots need a separate tall section — don’t try to angle them.
Try it: line up your shoes on the floor in pairs and measure the total width — divide by 24 to get your shelf count.
11. Pull-Out Baskets & Bins
Wire or canvas baskets on glides that pull out like drawers. They’re the answer for everything that doesn’t fold neatly and doesn’t hang: scarves, clutches, gym accessories, kids’ stuff, the “miscellaneous” pile that every closet accumulates.
Baskets beat bins for visibility — you can see through wire sides. Bins beat baskets for dust protection. I use wire baskets for daily items and lidded canvas bins for the high shelves where dust settles.
The measurements: standard pull-out baskets are 16-24 inches wide and 14-18 inches deep. Leave 20 inches of clearance in front for full extension.
Try it: designate one basket as the “homeless items” basket for a month — whatever’s still in it after 30 days probably doesn’t belong in your closet.
12. Belt, Tie & Valet Rods
Small pull-out rods and racks for the accessories that tangle: belts, ties, scarves, and the valet rod — a little pull-out hook for laying out tomorrow’s outfit. These are cheap modules (usually $15-40) with outsized daily impact.
The valet rod is my favorite tiny luxury. Pull it out at night, hang tomorrow’s outfit, push it back. Mornings get noticeably calmer when the decision was made the night before.
The measurements: belt and tie racks need just 4-6 inches of width on a shelf edge or tower side. Valet rods extend about 12 inches — mount one at chest height near the closet entrance.
Try it: hang tomorrow’s full outfit — including accessories — on one valet rod tonight. It’s the smallest habit with the biggest morning payoff.
Smart Add-Ons: The Finishing Touches
The modules above do the heavy lifting. These two add-ons make the closet feel finished.
13. LED Closet Lighting
Battery-powered or hardwired LED strips and puck lights that turn a dark closet into a space you can actually see in. This matters more than it sounds — you can’t wear what you can’t see, and dark corners become dead storage.
Motion-sensor puck lights ($15-25 for a 3-pack) are the renter-friendly move: stick them under shelves, they light up when you walk in. Hardwired LED strips along the top track look more built-in but need an electrician or a handy homeowner.
The measurements: one puck light per 24 inches of shelf width; strips run the full length of the top track. Go for 3000K warm white — daylight bulbs make clothes look washed out.
Try it: stick one motion puck light in your darkest closet corner tonight — you’ll immediately see which clothes you’ve been ignoring.
14. Hooks, Dividers & Labels
The unglamorous trio that keeps the system working: hooks for bags and robes, shelf dividers to keep stacks from toppling, and labels so everyone in the house puts things back in the right place.
Shelf dividers are the single most underrated closet accessory. Folded stacks migrate sideways within days; a $10 set of acrylic dividers keeps them standing at attention for months. Labels matter most in shared closets — “his,” “hers,” “kids,” or by category.
The measurements: dividers come in 8-12 inch heights to match shelf spacing. Hooks hold 5-15 lbs each — fine for bags, not for a loaded backpack.
Try it: label just three shelves this weekend — the household will self-organize around the labels faster than any lecture.
The 10-Minute Wardrobe Audit (Do This Before You Buy)
Every closet guide tells you to “plan your layout.” Almost none tell you how. Here’s the audit I do before buying a single module — it takes ten minutes and prevents the most expensive mistake (buying the wrong modules).
Step 1: Count by category. Pull everything out (yes, everything) and sort into five piles: long-hang (dresses, coats), short-hang (shirts, jackets, pants), folded (sweaters, tees, jeans), shoes (pairs), and accessories/drawer items. Count each pile.
Step 2: Measure the outliers. Find your longest garment, your tallest boots, your widest bag. These three measurements dictate your long-hang height, boot shelf spacing, and shelf depth.
Step 3: Be honest about the 80/20. About 80% of us wear 20% of our clothes. If a pile is mostly “maybe someday,” the answer isn’t more modules — it’s a donation bag. No system organizes clutter; it just stores it expensively.
Step 4: Translate counts to modules. Rough rule: 20 short-hang items = one 24-inch double-hang section. 20 folded items = one 24-inch shelf stack. 10 pairs of shoes = two angled shelves. 1 drawer tower handles one person’s underwear, socks, and accessories.
I skipped this audit on my first closet and bought three long-hang sections for a wardrobe with six long items. The audit would have saved me $200 and a weekend of reconfiguration.
How to Measure Your Closet in Inches
Grab a tape measure and record these seven numbers before you shop. Every brand’s design tool asks for them, and having them ready turns a confusing process into a simple one.
- Width — wall to wall at the back, in inches. Measure at the top, middle, and bottom; old walls bow. Use the smallest number.
- Depth — back wall to the front edge (door frame). Standard reach-ins are 24 inches deep; walk-ins vary. Anything under 24 inches deep can’t fit standard hangers front-to-back (they need 22-24 inches).
- Height — floor to ceiling. Standard is 96 inches (8 feet). This sets your top shelf and track height.
- Door swing and opening — measure the door width and which way it swings. Doors that swing into the closet eat floor space; note it so you don’t plan drawers where the door lands.
- Obstructions — light fixtures, outlets, vents, attic hatches, sloped ceilings. Mark their positions and heights; modules must work around them.
- Baseboards — note their height (usually 3-5 inches). Wall-mounted standards sit above them, but floor-based towers must clear them.
- Stud positions — find and mark every stud with painter’s tape. The top track must screw into studs, not drywall. Studs are typically 16 inches apart, but verify — I’ve found 24-inch spacing in older apartments.
The clearance cheat sheet (tape this inside the closet door while planning):
- Double-hang rods: 40″ and 80″ from floor
- Long-hang rod: 68-70″ from floor
- Top shelf: 12″ below ceiling
- Shelf depth: 14″ for clothes, 16″ for bins
- Drawer clearance in front: 24″
- Walkway in walk-in closets: 30″ minimum, 36″ comfortable
Types of Modular Closet Systems Compared
All modular systems fall into three types. The right one depends on your budget, your walls, and how “built-in” you want it to look.
Wire systems (ClosetMaid, EasyTrack) are the entry point: vinyl-coated wire shelves and rods on wall-mounted standards. Cheapest ($100-400 per closet), lightest, best airflow. Downsides: the industrial look isn’t for everyone, wire can snag delicates and leave marks on knits, and weight capacity is lower.
Laminate systems (IKEA ALGOT/BOAXEL, Amazon kits, Elfa’s solid options) use melamine-coated particleboard shelves with metal hardware. The sweet spot for most people: clean look, solid shelves, mid-range price ($300-1,200 per closet). Heavier than wire, so stud mounting is non-negotiable.
Wood-look tower systems (IKEA PAX, Elfa Décor, Contempospace-style kits) build around floor-standing towers with doors and drawers, flanked by hanging sections. Most “custom” appearance, highest storage density, highest price ($800-3,000+ per closet). Best for walk-ins where you want furniture-grade looks.
My honest take: start with the type that matches your commitment level. Renting for a year? Wire or a basic laminate rail system you can take with you. Own your home and want the dream closet? Wood-look towers are worth it.
Best Modular Closet System Brands at a Glance
| Brand | Type | Price per Closet | Best For | Watch Out For |
|---|---|---|---|---|
| Elfa (Container Store) | Rail-mounted wire/solid | $500-2,000 | Maximum adjustability, renters | Costs climb fast with drawers |
| IKEA PAX | Floor-standing towers | $800-3,000 | Built-in furniture look | Fixed IKEA dimensions |
| IKEA ALGOT/BOAXEL | Wall-mounted laminate | $300-1,000 | Budget built-in look | Discontinued lines replaced often |
| ClosetMaid / EasyTrack | Wire rail system | $100-400 | Tight budgets, quick installs | Wire snags delicates |
| Amazon modular kits | Laminate towers | $200-800 | All-in-one box convenience | Quality varies by seller |
Elfa remains the gold standard for flexibility — everything hangs from one stud-mounted track and repositions without tools. IKEA PAX wins on looks per dollar if your closet fits its dimensions (widths in roughly 20/30/40-inch increments). For pure budget, ClosetMaid-style wire systems from Home Depot or Lowe’s get the job done for the price of a nice dinner out.
How Much Do Modular Closet Systems Cost?
Real numbers, because “it depends” helps nobody:
- Budget wire system, DIY: $100-400 per reach-in closet. One weekend, basic tools, done.
- Mid-range laminate system, DIY: $400-1,200 per closet. The most common setup I see — looks great, lasts years.
- Premium tower system, DIY: $1,000-3,000 per closet. PAX-style with doors, drawers, and lighting.
- Professionally installed modular: $1,000-4,000 for a reach-in or small walk-in, depending on size and finishes. You’re paying for measurement, design, and a perfect install.
- Full custom built-in (for comparison): $3,000-10,000+. Modular saves 40-60%.
The hidden costs nobody lists: extra brackets and shelves you’ll inevitably add ($50-150), LED lighting ($30-100), drawer organizers and dividers ($40-80), and patching/paint if you’re a renter moving out ($20). Budget 15% over the kit price and you won’t be surprised.
My money-saving rule: buy the frame and hanging modules first, live with it for a month, then buy accessories. You’ll purchase half the add-ons once you know what you actually reach for.
Installation: DIY or Hire a Pro?
DIY it if: you own a drill, a level, and a stud finder — that’s genuinely the whole toolkit. Most rail systems go up in 2-4 hours for a reach-in closet. The instructions are good, the parts are light, and there’s no cutting involved (that’s the point of modular).
Hire a pro if: your walls are plaster, concrete, or brick (anchoring is trickier), you’re doing a large walk-in with towers that need leveling, or you want hardwired lighting. A handyman charges $200-500 for a standard install — still far cheaper than full custom.
The step everyone skips: leveling the top track. An unlevel track means every shelf below it is unlevel, and drawers that don’t close right. Spend ten extra minutes with the level here; it pays off for years.
Renter special: use a rail system mounted with the minimum screws into studs, keep the original hardware in a labeled bag, and photograph the wall before you start. Patching 6-8 small holes at move-out takes twenty minutes with spackle.
7 Common Mistakes to Avoid
1. Buying before measuring. The #1 expensive mistake. Every brand’s parts come in fixed widths — if your closet is 58 inches wide and you bought 60 inches of modules, you’re returning boxes. Measure twice, order once.
2. Planning for the wardrobe you wish you had. Three long-hang sections for six dresses. Be honest about what you own today; the system can grow later.
3. Skipping the studs. A track held by drywall anchors will eventually pull out under a closet’s worth of clothes. I watched a friend’s shelf collapse at 2am — find the studs, every time.
4. Forgetting the door swing. Drawers planned where the door opens, rods blocked by the door arc. Tape your door’s swing on the floor before finalizing the layout.
5. All open shelving, no doors. It looks great on day one and chaotic by month three. Hide at least 20% of your storage behind doors or in drawers.
6. Ignoring lighting. A dark closet wastes the storage you just built. One $20 motion light changes everything.
7. Over-accessorizing on day one. Baskets, dividers, valet rods, tie racks — buy the structure first. Live with it a month, then accessorize for your actual habits.

Modular Closet Systems at a Glance
| Question | Short Answer |
|---|---|
| What is it? | Interchangeable shelves, rods, drawers & cabinets that snap together |
| Typical cost (DIY) | $100-1,200 per reach-in closet |
| Typical cost (installed) | $1,000-4,000 per closet |
| Install time | 2-4 hours for a reach-in |
| Tools needed | Drill, level, stud finder |
| Renter-friendly? | Yes — rail systems leave only small patchable holes |
| Can it move with you? | Yes — uninstall and reconfigure in the new space |
| Best for small closets? | Double-hang sections + one drawer tower |
| Lifespan | 10-15+ years for quality laminate/wood systems |
FAQ About Modular Closet Systems
Are modular closet systems sturdy?
Yes, when mounted correctly. The secret is the top track screwed into wall studs — a properly installed rail system holds hundreds of pounds. Wire systems hold less than laminate or wood-look towers, so check the weight ratings if your wardrobe is heavy on coats and denim.
How much does a modular closet system cost?
A DIY wire system runs $100-400 per reach-in closet; a mid-range laminate system costs $400-1,200; premium tower systems run $1,000-3,000. Professionally installed modular closets typically land between $1,000 and $4,000 depending on size and finishes.
Can I install a modular closet system myself?
Absolutely — most are designed for it. You need a drill, a level, and a stud finder, plus 2-4 hours for a standard reach-in. The trickiest part is getting the top track perfectly level; everything else hangs off that one line.
What’s the difference between modular and custom closets?
Custom closets are built on-site from raw materials and permanently fixed in place — beautiful but expensive ($3,000-10,000+) and immovable. Modular closets use pre-made standardized components you assemble yourself; they cost 40-60% less and can be reconfigured or moved.
Are modular closet systems good for renters?
They’re one of the best renter upgrades. Rail-mounted systems attach with a handful of screws into studs — patchable in minutes at move-out. Freestanding tower kits need no wall mounting at all. And you can take the whole system to your next apartment.
How do I measure my closet for a modular system?
Measure width (wall to wall, use the smallest of three readings), depth (back wall to door frame), and height (floor to ceiling) in inches. Note the door swing, obstructions like vents and light fixtures, and mark every wall stud with painter’s tape. Most brands offer free online design tools where you plug these numbers in.
Which modular closet system is best?
Elfa (Container Store) wins for adjustability and quality; IKEA PAX wins for the built-in furniture look on a budget; ClosetMaid-style wire systems win for the lowest price. The “best” is the one that fits your closet’s measurements, your budget, and how long you’ll live there.
Can a modular closet be changed after installation?
That’s the entire point. Shelves and rods slide to new positions in minutes on rail systems, and whole modules can be moved, swapped, or added as your wardrobe changes. Converting a long-hang section to double-hang is a twenty-minute job, not a remodel.
Final Thoughts on Modular Closet Systems
A modular closet system is the rare home upgrade that’s cheaper and more flexible than the alternative. You get the custom look, the layout follows your actual clothes, and when life changes — new job, new city, new wardrobe — the closet changes with you instead of fighting you.
Start with the wardrobe audit, measure in inches, buy the structure before the accessories, and mount that top track into studs. Do those four things and you’ll wonder why you ever lived with a single rod and a wire shelf.
What’s the one closet frustration you’d fix first — more hanging space, hidden storage, or shoe chaos? Start there, and build out from the win.


Founder of NestFlavors — sharing tested recipes and honest home ideas, made for real life.